
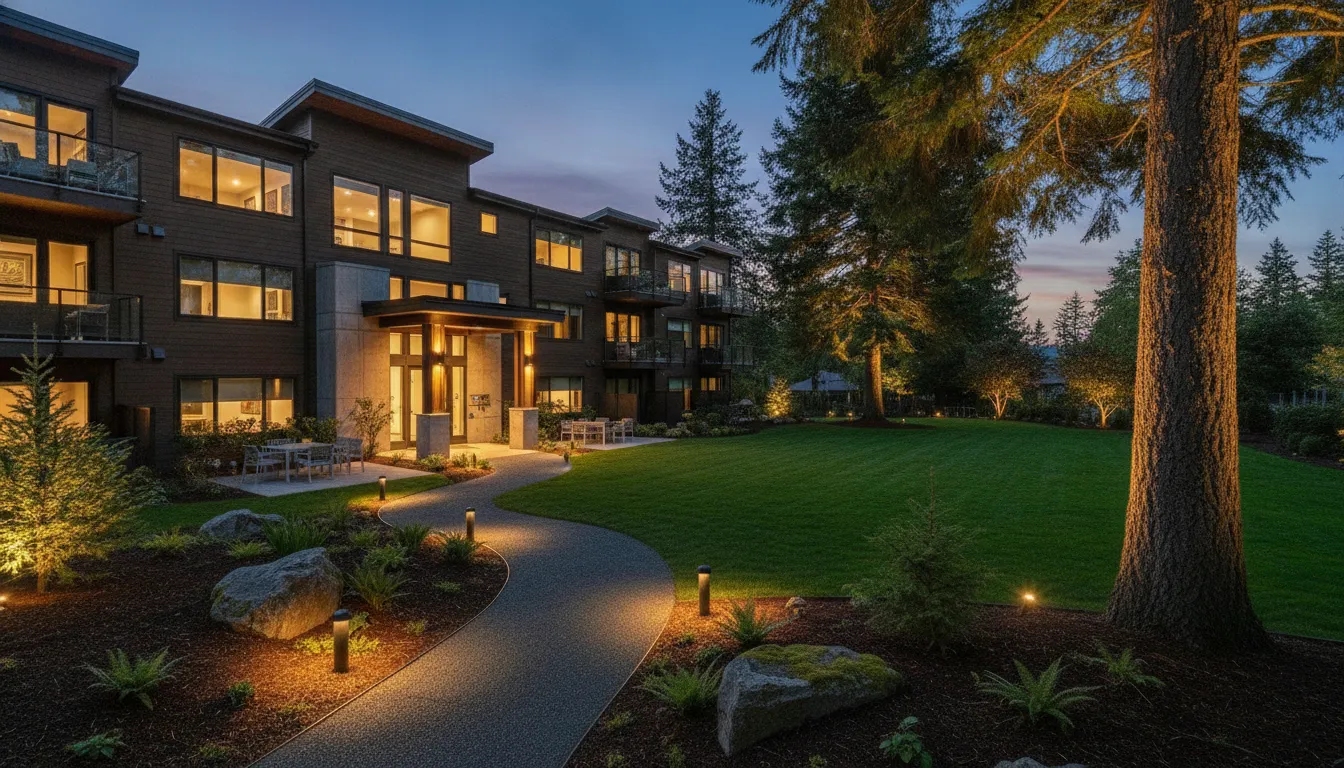
Dark stretches along a walkway or a harsh beam shining into a resident’s window can make outdoor lighting feel like a problem instead of a solution. For property managers, getting the balance right means considering safety, appearance, operating costs, and upkeep at the same time. Landscape lighting for managed properties in Oregon should also reflect local conditions, from persistent western Oregon rain to coastal salt air and Central Oregon freezes. Start by walking the grounds after dark and noting where people need better visibility. Then consider fixture placement, weather-resistant materials, smart controls, and access for repairs. These practical steps can help you plan a system that serves residents, visitors, and staff.
Key Takeaways
- Start with the site’s real needs: Identify frequently used routes, shared areas, dark spots, and Oregon-specific weather conditions before choosing fixtures.
- Match lighting and controls to each space: Use focused, comfortable light for paths, entrances, and landscape features, with efficient LEDs and schedules suited to how the property operates.
- Plan for long-term care: Compare product durability, warranties, repair access, and installation details, then inspect fixtures and adjust the system as the landscape changes.
Plan Landscape Lighting for Oregon Properties
A useful landscape lighting plan starts with how people move through the property. For a managed community or commercial site, that means considering residents, visitors, employees, delivery drivers, and maintenance crews. Walk the grounds and note the routes people use, the areas they share, and the places where visibility matters most. A fixture that looks attractive beside a garden may not provide enough light for a stairway or parking route.
Next, consider the conditions that can affect performance throughout the year. Oregon properties vary from rainy western valleys to salt-exposed coastal areas and colder parts of Central Oregon. Drainage, soil, plant growth, and seasonal changes can all influence fixture placement and upkeep. Bringing these factors into the plan early helps you select suitable products and avoid installations that are difficult to maintain.
For managed properties, it also helps to coordinate lighting decisions with landscaping, building maintenance, and operations teams. They can flag irrigation lines, planting plans, access requirements, and shared-space schedules before installation begins. Use the walk-through to record existing fixtures, dark areas, and light spilling toward windows or neighboring properties. Those notes give your lighting provider a practical starting point and help keep the final design useful, comfortable, and consistent across the site.
Audit Walkways, Stairs, Entrances, Parking Routes, and Shared Spaces
Walk the property after dark, or map the routes people use most often. Check paths between parking areas and entrances, steps, ramps, building thresholds, patios, mail areas, and shared outdoor spaces. Note places where a change in level, an obstacle, or a walkway edge may be hard to see.
Each area has different needs. Path lights can help define a walkway, while step lights can make stair treads more visible. Entrances may call for broader illumination, and shared spaces may need lighting that supports evening use without shining into nearby windows. This outdoor lighting checklist can help you assess how each space is used before choosing fixtures. Record existing dark spots and glare so the layout addresses both.
Prioritize Safety, Appearance, Energy Use, and Maintenance
Start with clear, comfortable routes, then consider which trees, signs, or architectural features deserve accent lighting. A thoughtful plan can support safety and appearance while making shared outdoor areas more usable after dark. For a managed property, account for energy use and routine maintenance as well as the initial look.
LEDs and suitable controls can reduce energy consumption compared with older lighting systems. Choose fixtures that maintenance teams can reach, clean, and service without disrupting residents or business operations. Consider how often components may need attention and whether replacement parts will be easy to obtain. This commercial landscape lighting guide offers further considerations for balancing safety, appearance, operating costs, and upkeep.
Plan for Western Oregon Rain, Coastal Salt, and Central Oregon Freeze-Thaw
Choose fixtures for the property’s actual conditions. Frequent rain in western Oregon makes outdoor ratings, protected connections, and thoughtful placement important. Coastal locations may need materials that resist corrosion from salt exposure. In Central Oregon, freezing temperatures and repeated freeze-thaw cycles can affect fixtures, wiring, and the ground around them.
Ask your lighting provider how products and installation methods suit your location. Confirm that fixtures are rated for outdoor use and that connections will be protected from moisture. Placement also matters: fixtures in low areas may be exposed to standing water, while equipment near walkways may face contact from snow removal or landscape work. Quality products still need proper installation and periodic checks. This Oregon landscape lighting guide shares additional advice for planning around regional weather.
Consider Drainage, Soil, Plant Growth, Sun, and Seasonal Changes
Before setting fixture locations, check how water moves across the site and where soil stays wet. Avoid spots where water regularly pools, and ask how soil conditions may affect buried wiring or fixture stability. Coordinate with landscaping teams to account for roots, irrigation lines, mulch, and planned planting work.
Allow for plants to grow. Branches can block light, and groundcover may hide low fixtures over time. Fallen leaves can cover lights or trap moisture, so consider how easily each fixture can be reached for seasonal maintenance. If you’re considering solar fixtures, check whether the location receives enough direct sunlight throughout the year. Selecting products suited to wet conditions and planning for access can make upkeep simpler. These common landscape lighting issues can help you compare options.
Choose the Right Landscape Lighting Fixtures
The right landscape lighting fixtures depend on how people use each part of a property. Walkways need steady, comfortable light underfoot. Entrances need enough illumination to identify doors, steps, and locks. Trees, signs, and architectural details call for focused accent lighting. Choosing fixtures for specific tasks helps managed properties support safe movement and create a consistent look without overlighting every corner.
Before selecting products, map the routes and shared spaces residents, guests, customers, and staff use most. Note stairs, parking routes, entrances, seating areas, and features worth highlighting. Then consider Oregon’s conditions: frequent rain in western Oregon, salt exposure near the coast, and freeze-thaw cycles in central Oregon can affect fixture materials and installation. Account for drainage, plant growth, and access for future cleaning or repairs.
Whenever possible, review the plan after dark. Check for glare, dim stretches, and shadows, then adjust fixture type, spacing, or aim. Guidance on pathway and step lighting highlights how the right fixtures can improve visibility on walkways and stairs. A thoughtful mix of fixtures can serve practical needs while complementing the property’s landscape and buildings.
Use Path, Step, and Area Lights for Safe Circulation
Path lights help people see where they’re going while defining walkways and garden routes. Space them to create an even rhythm of light, and aim each fixture toward the walking surface rather than directly into approaching eyes. For stairs, step lights near or within risers make changes in elevation easier to spot. Keep fixtures clear of groundcover and protected from routine lawn care.
Area lights can cover larger shared spaces, including courtyards, seating areas, and routes between parking and building entrances. Choose output and placement to fill dark areas without creating harsh contrasts or bright hotspots. Keep fixture styles and color temperatures consistent across connected paths and stairs. These landscape lighting recommendations identify pathway and step lighting as useful choices for improving visibility.
Mount Fixtures at Entrances and Along Building Perimeters
At entrances, provide enough light for people to find doors, read locks, and notice nearby steps or obstacles. Wall-mounted fixtures, eave downlights, and carefully aimed area lights can all work, depending on the building. Check the view from the approach path and parking area, and make sure the light doesn’t shine into neighboring windows.
Along building perimeters, focus on areas that need visibility, such as shadowed doorways, service routes, and back-of-house spaces. Rather than lighting every wall, place fixtures where they address a specific concern and avoid unnecessary spill. Commercial properties should assess both public entrances and staff-only areas. Commercial landscape lighting guidance recommends addressing shadows around building perimeters and placing fixtures at entrances to support visibility and security.
Highlight Trees, Signs, and Architecture with Spotlights and Well Lights
Accent fixtures draw attention to features that help give a property character. Spotlights can illuminate a sign, tree trunk, or textured wall. In-ground well lights provide an uplighting effect while keeping the fixture itself less prominent. Consider how each feature looks from common viewpoints, including walkways, entrances, and shared seating areas.
Aim lights at the feature, not at windows or across property lines. For trees, allow room for growth and keep fixtures accessible for adjustment as branches change. Softer light and indirect techniques often create a more comfortable effect than a bright beam aimed straight at a surface. Landscape lighting advice from Lucky Lawn discusses uplighting trees and downlighting from eaves to highlight landscape and architectural details.
Match Output, Beam Spread, and Placement to Each Task
Brightness alone won’t tell you whether a fixture is right for the job. Beam spread determines how widely light falls, while placement and aiming affect what gets illuminated. A narrow beam may suit a column or tree trunk; a wider beam may better cover a walkway or gathering area. Match the fixture to the task so it provides useful visibility without lighting areas that don’t need it.
Test the arrangement after dark, especially where beams overlap. Look for bright spots, gaps, and light aimed toward people’s eyes or windows. Pale walls and paving can reflect more light than expected, so adjust the output or angle if an area feels too bright. The reflective principle for spotlight placement is a useful reminder to consider how the beam meets each surface for balanced illumination and less glare.
Compare Commercial-Grade Products, Parts Availability, and Manufacturer Support
On a managed property, a fixture’s performance over time matters as much as its appearance. Compare products designed for outdoor and commercial use, and ask about weather resistance, materials, replacement parts, and repair options. Fixtures with serviceable components may make maintenance simpler than units that require full replacement when one part fails.
Ask providers for manufacturer names, model numbers, product specifications, and warranty details. Find out whether replacement parts are readily available and what technical support the manufacturer offers. Confirm that the recommended fixtures will work with the property’s transformer, wiring, and controls. Commercial-grade lighting guidance highlights the value of products suited to demanding outdoor conditions, along with parts availability and manufacturer support. Weigh those details alongside the installer’s experience and service commitments, rather than comparing fixtures by upfront price alone.
Compare Key Lighting Features
For managed properties, landscape lighting needs to do more than look good on installation day. It should stand up to Oregon’s rain, temperature swings, and, in coastal locations, salt exposure. The right choices can also make routine maintenance and energy costs easier to plan.
Compare fixture specifications alongside the installation proposal. Ask about energy use, wet-location suitability, materials, warranty terms, replacement parts, and access for repairs. Then look at how the installer plans to aim and position each light. A low-cost fixture may cost more over time if it needs frequent service, while a quality product may still disappoint if it is poorly installed. The sections below cover the features that help you compare options for shared outdoor spaces.
Prioritize Efficient LEDs and Long-Term Operating Costs
LEDs are a practical choice for properties that need reliable lighting across walkways, entrances, and parking routes. Their energy use is generally lower than that of traditional outdoor lamps, which can help manage electricity costs when lights run for many hours each night. Quality fixtures may also last for years, though actual service life depends on the product, installation, and local conditions. A Portland landscape lighting guide estimates that quality LED fixtures can last 15 to 20 years.
When comparing products, ask for wattage, expected lifespan, and replacement-part details. Estimate operating costs based on the number of fixtures and their schedules, rather than comparing bulb prices alone. This gives property managers a clearer picture of long-term expenses.
Check Wet-Location Ratings, Sealed Connections, and Corrosion Resistance
Outdoor fixtures should be rated for the conditions where they will be installed. Check manufacturer specifications and confirm that each fixture is listed for its intended location. An IP65 rating indicates protection from dust and water jets, but it does not replace the need to verify the product’s electrical listing and suitability for the site.
Pay close attention to wiring connections, especially in planting beds, near irrigation, or wherever water can collect. Ask the installer how connections will be sealed and protected from moisture. Poorly protected connections may corrode or cause intermittent lighting. Oregon properties face plenty of wet weather, so these details are worth confirming before work begins. NSL USA’s fixture guidance explains why enclosed designs and appropriate wet-location protection matter.
Compare Brass, Stainless Steel, and Other Durable Materials
Fixture materials influence how well lights withstand moisture, soil, and regular site activity. Brass and marine-grade stainless steel are often selected for outdoor use because of their durability. In coastal areas, salt in the air can make corrosion resistance especially important. Ask about the housing, fasteners, and finish, since smaller components can wear or corrode even when the fixture body is sturdy.
Match materials to each fixture’s location. Lights beside paths may be exposed to foot traffic or landscaping equipment, while fixtures in garden beds can sit in damp soil or encounter fertilizer. Durable construction can help reduce replacement needs, but service access matters too. Compare product specifications and maintenance requirements, not appearance alone. NSL USA’s recommendations include corrosion-resistant materials and accessible designs for easier upkeep.
Review Warranties, Replaceable Parts, and Repair Access
A warranty can help clarify what support to expect, but check the terms before comparing products. Find out how long coverage lasts, which components it includes, and whether it covers labor or only the fixture. Ask if parts such as LEDs, lenses, and drivers can be replaced separately. If a small component fails, replacing the entire fixture may add avoidable cost.
Consider whether a technician can reach fixtures, wiring, and connections without disrupting landscaping or property operations. Accessible designs can make inspections and repairs simpler across larger sites. Request details about how replacement parts are ordered and how long they typically take to arrive. Commercial product lines vary in their service options, so ask your provider to explain how the recommended fixtures can be maintained over time. Commercial lighting product comparisons can also help you assess how product options differ.
Weigh Product Quality and Installer Expertise Against Price
Compare project proposals by what they include, not only by the final price. A detailed quote should identify fixture models, placement, controls, wiring, installation work, and warranty coverage. Ask why each fixture suits its location and how the design will illuminate important areas without creating glare or bright patches. A balanced layout can highlight entrances, paths, and landscape features while leaving some areas free of unnecessary light.
The installer’s experience matters because placement, aiming, wiring, and voltage affect how the system performs. Ask for examples of similar managed properties and find out how the provider handles service after installation. A lower bid may leave out durable fixtures, careful adjustments, or ongoing support. Consider those differences alongside the upfront price. Landscape design guidance also emphasizes balancing key features with open space, a useful principle when planning shared areas.
Improve Safety Without Glare or Light Trespass
Effective landscape lighting helps residents, visitors, and staff move around a property with confidence, without shining harsh beams into windows or neighboring spaces. For managed properties, that balance matters across walkways, entrances, parking routes, and shared outdoor areas. The goal is not to make every corner bright. It’s to place light where people need it, then keep it controlled and comfortable.
Start by identifying where people change direction, step up or down, unlock doors, or move between buildings. Consider how each fixture will affect nearby surfaces, windows, and other lights. A bright beam reflected off a pale wall can create glare, while a dark transition between a path and a set of stairs can make it harder to see each step.
Plan for consistent coverage, appropriate brightness, and carefully aimed fixtures. Also consider how rain, plant growth, and seasonal changes may affect visibility and light placement. Walk the property after dark to spot gaps, glare, and light spilling beyond the intended area. Before installation, review local requirements and have electrical work assessed by a qualified professional. These steps can make outdoor routes easier to use while keeping lighting considerate of residents, neighbors, and the surrounding environment.
Light Stairs, Walkways, Entrances, and Parking Routes
Focus first on the routes people use every day: stairs, changes in elevation, walkway intersections, building entrances, and paths between parking areas and doors. Even, well-directed light can help people see obstacles and judge distances. Place fixtures so their bulbs don’t shine directly into the eyes of someone approaching.
Path lights, step lights, and entry fixtures each have a distinct purpose. Use step lights to reveal changes in level, and position path lights so their coverage overlaps without creating bright spots beside dark stretches. At entrances, illuminate the door and the approach, not just nearby landscaping. Larger properties may benefit from a professional lighting plan that accounts for fixture output and beam spread. Photometric planning can help create more even coverage along routes and across shared spaces.
Limit Light Spill with Shielded Fixtures and Careful Aiming
Choose fixtures with shields, hoods, or other features that direct light toward the ground or the intended area. Aim adjustable fixtures carefully, then check their effect from common viewpoints, including nearby windows and property boundaries. A light that looks well placed from the installation point may still shine into a resident’s room or cause glare for someone walking by.
Keep beams focused, and avoid pointing spotlights above the horizon. This is especially important near building façades, property lines, and reflective surfaces. After dark, check each fixture and adjust its direction if the beam spills farther than intended. Shielding and careful aiming can reduce glare while keeping light focused where it serves a purpose. Malory Lighting’s landscape spotlight guidance offers useful considerations for positioning outdoor fixtures.
Choose Comfortable Brightness and Warm Color Temperatures
More light does not always mean better visibility. An overly bright fixture can create glare and make nearby areas seem darker by contrast. Match light output to the task: an entrance may need clear, focused illumination, while a garden bed usually needs only a subtle accent.
Warm color temperatures can create a more comfortable feel around homes and shared outdoor areas. Keep color temperatures consistent among nearby fixtures for a more cohesive look, and check the result after dark before finalizing placement. If a light feels harsh, try reducing its output, adding a shield, or redirecting the beam rather than installing more fixtures. Outdoor lighting recommendations reinforce the value of choosing brightness based on what each area requires.
Reduce Dark Spots, Harsh Shadows, and Overlighting
A thoughtful plan avoids both bright pools separated by dark gaps and broad floodlighting that washes out the property. Look for abrupt changes in brightness along paths and near doors, stairs, and parking routes. Add or reposition fixtures where people need to see a change in surface or direction, rather than lighting every area equally.
Layered lighting can create a softer, more useful result. A low path light can guide movement while a shielded fixture illuminates a doorway. For landscape accents, try indirect approaches such as downlighting from an eave or restrained uplighting on a tree. Check for shadows cast by shrubs, signs, and parked vehicles, then adjust fixtures as the site changes. These landscape lighting tips can help reduce harsh shadows and unnecessary brightness.
Check Local Ordinances, Electrical Codes, and Site Requirements
Before work begins, check whether local rules address outdoor fixture placement, light spill, or operating hours. Managed properties may also have site standards, lease conditions, or design guidelines. Requirements vary by location, so confirm details with the relevant local authority instead of assuming one lighting plan works everywhere in Oregon.
Electrical work should meet applicable codes and be completed by a qualified professional. Discuss wiring routes, connections, transformers, and wet-location ratings, especially where fixtures face rain or irrigation. Ask how the installation will meet code and how fixtures will be accessed for maintenance. Oregon property owners can review an electrical contractor’s landscape lighting service information for an example of how NEC and local code requirements factor into installation planning.
Layer Lighting for Shared Spaces
Shared outdoor spaces need lighting that helps people move safely while making the property feel welcoming. A layered plan combines practical illumination with softer accents, and keeps the look consistent across buildings and gathering areas. In Oregon, choose fixtures and layouts that can handle wet weather and changing seasons.
Combine Path, Accent, and Entry Lighting for Function and Balance
Begin with the routes people use most, including walkways, stairs, parking areas, and entrances. Path and step lights make changes in elevation easier to see, while entry lighting helps visitors find doors and approach them comfortably. Add accent lighting to selected trees, signs, or architectural details to give the property visual depth.
Give each fixture a clear purpose. Placing too many lights too close together can create glare and distracting bright spots. Instead, focus on key areas and leave some spaces softly lit to maintain balance. Thoughtful placement can support safety and appearance at the same time, as Malory Lighting’s landscape spotlight guidance explains.
Choose Low-Profile Fixtures and Purposeful Illumination
Fixtures in shared spaces should provide useful light without obstructing walkways or drawing attention away from the landscape. Low-profile path lights and carefully placed step lights work well along narrow routes. Aim lights downward or use shielding to limit glare near windows, seating areas, and neighboring properties.
Choose outdoor fixtures with sealed connections and ratings suitable for wet locations. Oregon properties may face frequent rain, damp soil, and periods of freezing, so weather resistance can reduce maintenance concerns. Ask your installer which products suit the site and how connections will be protected. NSL USA’s guidance on landscape fixtures highlights wet-location protection and durable products as important considerations for long-term performance.
Coordinate Landscape Lighting with Permanent, Bistro, and Holiday Lighting
Landscape lighting should work with other outdoor systems, including permanent roofline lights, bistro lighting in courtyards, and seasonal holiday displays. Consider how fixture placement, brightness, and light color will look together from paths, windows, and shared gathering areas. This helps each system contribute to the property instead of competing for attention.
Planning these elements together can also prevent overlapping beams and overly bright zones. A lighting professional can review the property as a whole, plan coverage, and organize controls for different areas. All Ways Electric’s landscape lighting overview describes how beam spread, light output, and color temperature affect both appearance and function. Coordinating these details can make shared spaces feel more comfortable and visually connected.
Keep Designs Consistent Across Buildings and Common Areas
On a multi-building property, repeated fixture styles and similar light color can create a cohesive look. Use a consistent approach at entrances and along main routes, while allowing each area to meet its own needs. A courtyard may benefit from softer decorative lighting, while stairs and parking paths call for clear, practical illumination.
Create visual rhythm by connecting buildings, signs, paths, and landscape features. You do not need to light every tree or facade. Choose a few focal points and leave some areas unlit to preserve contrast. TLC Incorporated’s landscape lighting advice recommends focusing on key features and leaving room for negative space. Consistency can also make future additions and fixture maintenance easier to plan.
Choose Smart Controls and Efficient Options
Smart controls help managed properties provide dependable outdoor lighting without running every fixture at full brightness all night. Pair efficient LEDs with schedules, sensors, and separate lighting zones to suit how residents, visitors, and staff use each area. Before selecting a system, consider who will manage it, how often settings need to change, and whether staff can easily identify a problem.
Use Dimmers, Timers, Photocells, and Astronomic Controls
Choose controls based on the task. Dimmers lower light output when full brightness isn’t needed. Timers switch fixtures on and off at set times, while photocells respond to natural light. Astronomic controls use local sunrise and sunset data to adjust schedules as daylight hours change.
For larger properties, remote management can help staff oversee lighting across several buildings or common areas. Some systems can flag outages, making it easier to arrange service before residents report a dark walkway or entrance. Ask your lighting provider to explain how each control works with the fixtures and wiring, and how staff can adjust the settings. Review commercial landscape lighting controls to learn how schedules and remote monitoring can support property operations.
Set Zones and Motion Sensors for Different Property Needs
Divide the property into zones that reflect how people use each space. Entrances, walkways, parking routes, and shared patios may need different brightness levels and operating hours. Separate controls let staff keep busy routes lit while reducing output or switching off accent lighting in less-used areas. They also make it easier to adjust settings for events or seasonal displays.
Motion sensors can suit service entrances, storage areas, and routes that see occasional use. Set the on-time long enough for people to reach their destination, and position sensors to avoid triggering from passing traffic or swaying branches. App-based controls can give authorized staff a simple way to adjust lighting scenes for shared spaces. Explore how smart landscape lighting can create flexible scenes, then keep everyday settings straightforward for the team responsible for the property.
Adjust Schedules for Winter Darkness and Seasonal Use
Oregon’s daylight hours vary through the year, so a fixed schedule may leave walkways dark at dusk in winter or keep lights on after sunrise in summer. Photocells and astronomic controls can respond to changing daylight automatically. Programmable timers are another option, especially when staff can update them as seasons and property routines change.
Review schedules periodically, including after time changes and before winter evenings bring more use of lit routes. Set each zone according to its purpose: entrances and accessible paths may need consistent coverage, while decorative lighting can switch off earlier. Check that plants or other changes haven’t blocked fixtures or sensors. Thoughtful scheduling keeps lights aligned with how the property is used and helps avoid unnecessary daytime operation. Automatic controls can help keep landscape lights from running in daylight.
Choose Solar Fixtures Where Sun Exposure Supports Reliable Performance
Solar fixtures may be a practical choice for areas that receive enough direct sunlight to charge consistently. Assess exposure throughout the year, accounting for shade from buildings, evergreen trees, covered walkways, and neighboring structures. A location that gets strong sun in summer may receive much less in winter, when shorter days and cloudy weather can affect how long a fixture stays lit.
Consider solar for a garden feature or a remote area where installing wiring would be difficult. For entrances, parking routes, and other places that need dependable light every night, compare solar options with wired LED fixtures. Ask about expected operating hours, battery replacement, and performance in wet or cold conditions. A site assessment from a local lighting professional can help determine whether solar fixtures suit the property’s exposure and lighting requirements.
Compare Providers, Products, and Project Costs
Compare the full scope of each proposal, not just the final price. For a managed property, the right lighting plan should fit your site, support safe access, and be practical to maintain. Ask providers to spell out what they’ll install, how the system will operate, and what support they’ll offer after the work is complete.
Request Quotes for Fixtures, Controls, Installation, and Warranty
Request an itemized quote that lists fixtures, transformers, wiring, controls, labor, and any trenching or landscape repairs. Confirm the make, model, quantity, and intended use of each fixture. Specifics make it easier to compare bids and identify missing items, such as photocells, timers, or installation of control equipment.
Ask providers to explain product and workmanship warranties separately. Check how long each lasts, what it covers, and who to contact if a fixture or connection needs attention. Clarify whether service visits are included or billed separately. A detailed proposal from a contractor, such as Electrical Contractor Oregon, can help you understand the electrical work and reliability considerations involved.
Ask About Local Service, Product Specifications, and Ongoing Support
Ask whether the provider has worked on properties in your part of Oregon and understands local conditions. Rain, coastal salt, freeze-thaw cycles, soil type, and drainage can affect fixture materials, wiring protection, and placement. A plan suited to your property can help prevent avoidable service issues.
Request specifications for the proposed fixtures, including brightness, beam spread, wet-location rating, and construction material. Find out whether parts are replaceable, how quickly service calls are handled, and whether maintenance is available after installation. For managed properties, ask how crews coordinate work around residents, tenants, or business hours. Deschutes Advanced Electric describes working with property managers and considering local conditions.
Compare Volume Pricing, Seasonal Promotions, and Future-Addition Costs
If you manage multiple buildings or shared areas, ask whether the provider offers volume pricing for fixtures, installation, or ongoing service. Seasonal promotions can affect the total, but check that each quote includes the same equipment and work. A discount may not be valuable if the proposal excludes controls, trenching, or landscape repairs that another provider includes.
Discuss future additions before choosing a system. You may later want to light another walkway, entrance, or shared space. Ask whether the transformer and wiring plan can support that expansion, what adding fixtures would cost, and whether matching products will remain available. Compare the full scope and expected performance, not just the initial price. Magic Lite’s guide to common landscape lighting challenges highlights the importance of planning for long-term reliability and energy use.
Check Transformer Capacity, Wire Gauge, and Voltage Drop
For a low-voltage system, ask the installer to show how the transformer is sized for the planned fixtures. It should have enough capacity for the current design, with room for additions if you expect the property to grow. Have the provider explain the wiring layout and the gauge selected for each run.
Ask how the design will keep light levels consistent across the property. In a 12-volt system, voltage drop can make fixtures at the end of a long wire run appear dim or stop working. Wire gauge, run length, fixture load, and circuit layout all matter. A qualified provider should be able to explain how these factors were addressed. Magic Lite explains how voltage drop affects low-voltage landscape lighting.
Balance Upfront Costs with Energy Use, Repairs, and Replacements
A lower installation price may lead to higher operating or maintenance costs later. Compare fixture efficiency, expected nightly operating hours, and the ease of accessing connections for repairs. Ask providers to estimate energy use and explain which components may need replacement over time. Durable fixtures and readily available parts can also make ongoing maintenance more manageable.
For commercial properties, include the practical value of lighting in your comparison. Well-lit routes can support safer movement, while illuminated outdoor areas may remain useful after dark. Replacing older fixtures with LEDs can also reduce energy use. United Land Services outlines the benefits of commercial landscape lighting, including safety, extended use of outdoor spaces, and potential energy savings.
Maintain Landscape Lighting Through Oregon’s Seasons
Oregon’s rain, wind, seasonal plant growth, and freeze-thaw cycles can affect outdoor lighting in different ways. Regular checks help property managers keep walkways, entrances, parking routes, and shared spaces well lit while spotting small issues before they require larger repairs. Walk the property after severe weather, and schedule a more thorough review during seasonal grounds maintenance.
Inspect Fixtures, Connections, and Wiring After Wet or Freezing Weather
After heavy rain or freezing weather, check for lights that flicker, appear dim, or fail to turn on. Look for water inside fixture lenses, loose mounts, damaged wiring, or corrosion around connections. Give extra attention to fixtures near drainage areas, slopes, and other places where water collects.
Weather damage can make repairs more involved, particularly when fixtures are difficult to reach. This landscape lighting troubleshooting guide explains common problems, including corrosion and water damage. Keep a simple log of the fixture location, issue, and date so you can track recurring problems. If you spot exposed or damaged wiring, arrange service with a qualified lighting professional rather than attempting the repair yourself.
Clear Leaves and Plant Growth That Block Light or Trap Moisture
Leaves, mulch, and overgrown plants can cover fixtures, hold moisture around their bases, or block light from reaching paths and entrances. During fall and spring cleanups, clear debris and trim plants that have grown into a fixture’s beam. Leave enough room around each light for drainage and future maintenance.
Check the results after dark. Shrubs and tree branches can change how light falls across a walkway, even when the fixtures themselves still work. The advice on avoiding outdoor lighting mistakes highlights how landscaping can block fixtures and create dark spots. If trimming does not restore even coverage, adjust the fixture’s position or aim. Make sure the light still serves its purpose without shining into windows or neighboring properties.
Adjust Aiming, Mounting, Controls, and Voltage as the Landscape Changes
New trees, shrubs, fencing, or construction can change where light is needed. Soil movement can also tilt or loosen fixtures. After major landscaping or site work, check that each light points toward its intended area and remains securely mounted. Review timers and photocells as daylight hours shift, and update schedules so shared spaces are lit when residents, visitors, or employees use them.
If lights at the far end of a low-voltage system look dim, have a professional check the transformer, wiring, and voltage at the fixtures. Landscape lighting troubleshooting advice explains how voltage drop can affect distant lights. Addressing the cause helps maintain consistent illumination across the property, rather than simply replacing a fixture that may not be the source of the problem.
Schedule Accessible Repairs Around Property Operations
Plan repairs to limit disruption to residents, customers, and staff. Group service work by area, and schedule it during quieter hours or alongside planned grounds maintenance. Before the visit, note access points, areas that need to stay open, and any site requirements for working around utilities.
Keep paths to transformers and connections clear, and give your lighting provider an up-to-date fixture list or site plan. Fixtures placed behind dense planting or in busy areas can take longer to reach and service. This overview of common landscape lighting issues notes that difficult access can make maintenance more time-consuming. Reviewing access when planning repairs, or updating the layout, can make future service visits simpler.
Plan to Replace LEDs, Fixtures, and Components Over Time
Even well-made lighting systems need repairs and replacements over time. Track fixture age, service history, and repeat failures so you can plan ahead, especially for lights that serve key entrances, paths, and parking areas. When a component fails, check whether a compatible replacement is available and whether the existing system can support it.
For older systems, compare the cost of continued repairs with the operating costs of an LED upgrade. LEDs can use less energy, but replacement products still need to suit the transformer, wiring, and lighting plan. This commercial landscape lighting guide covers the decision between retaining older fixtures and converting to LED. Ask your lighting provider to recommend a phased replacement schedule that fits the property’s budget, maintenance needs, and priorities.
Frequently Asked Questions
What should a commercial landscape lighting plan include?
Start with the routes and spaces people use, such as walkways, stairs, entrances, parking areas, and courtyards. Add accent lighting only where it serves a clear purpose, and plan fixture locations, controls, and maintenance access with your property and landscaping teams.
Which outdoor fixtures work best for walkways and stairs?
Path lights can define walkways, while step lights help make changes in elevation easier to see. Select fixtures with suitable output and beam spread, then check the layout after dark for dim gaps, glare, and overly bright spots.
How can landscape lighting handle Oregon weather?
Choose fixtures rated for their installation locations, and ask how wiring connections will be protected from moisture. Consider corrosion-resistant materials near the coast, drainage at each fixture location, and freeze-thaw conditions in colder areas.
Are LEDs and smart controls a good fit for managed properties?
LEDs can use less energy than traditional lamps. Timers, photocells, and separate lighting zones can match operating hours to how people use each area. Ask your provider to confirm that the controls work with the proposed fixtures and are straightforward for staff to manage.
How often should commercial landscape lighting be inspected?
Check the system during seasonal grounds maintenance and after severe weather. Clear leaves and plant growth, look for damaged or dim fixtures, and confirm that schedules and aiming still suit the property. Arrange repairs with a qualified professional if wiring or connections are damaged.